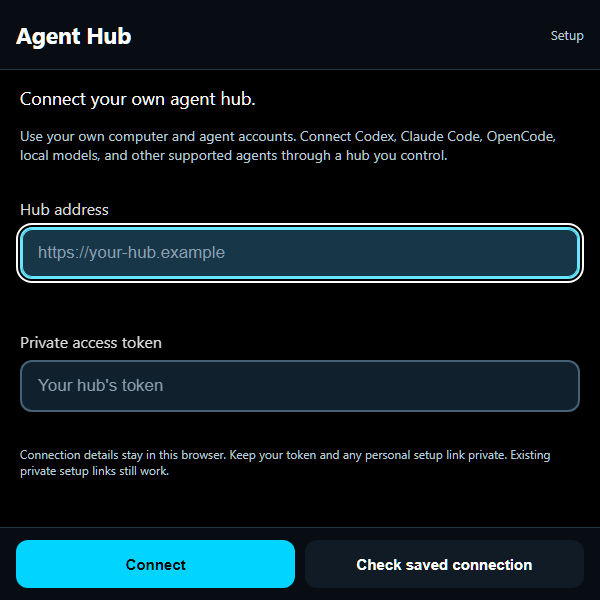
Agent Hub empty setup for connecting your own computer and agents
A closer look
Agent Hub, in a nutshell.
Agent Hub connects your display to coding agents on a Windows computer you control. Choose a computer, provider, project and conversation, then send prompts and follow the work from your glasses. The public app starts with no configured computers.
This is a bring-your-own-computer setup: you install the clean starter, sign in to your own providers and create a private connection. No creator computer, account, project, conversation, GitHub service or provider credit is included. Start with one provider; you can add more later.
Connect multiple computers within one Agent Hub installation, each with its own private address and token
Use your own Codex, Claude Code or OpenCode setup; additional local-model adapters are included
Choose projects and sessions, send prompts, and follow replies
Review supported permission requests from the display with ASK ME approvals
Download a clean Windows starter with a unique token generated on your own computer
ZIP for your own computer. Includes the server, setup guide and a blank configuration example. Install instructions are included inside.
Prepare the Windows computer you want to use
Install Node.js LTS 22 or newer using the official link below. Open Windows Terminal with PowerShell and check the versions below. Use the same Windows account for the starter and your agent logins. This walkthrough uses native Windows commands; do not mix a provider installed only inside WSL with this Windows hub. Git for Windows is recommended for Git projects and Claude Code’s Bash tools.
node --version
npm.cmd --version
Extract the starter and create your private token
Download the starter ZIP above, extract all files into a folder you own, then open PowerShell in that folder. Run setup once. It creates .env with a fresh 256-bit BRIDGE_TOKEN and will not overwrite an existing file. The hub itself needs no npm install. Open .env locally when configuring providers; this token is the hub password, not a provider API key. Keep the file private.
npm.cmd run setup
notepad .env
Install and enable one provider first
Follow the matching provider section below and complete its login on this computer. For Codex or Claude Code, install the pinned local adapter below and set BRIDGE_AUTOSTART=1 in .env; this starter targets adapter version 0.7.7. Its package name refers to a shared local adapter, not a different glasses app. For OpenCode or local models, leave BRIDGE_AUTOSTART=0 unless you also want Codex or Claude Code. Keep PROXY_HOST=127.0.0.1, HUB_AUTOSTART=0 and HUB_DISTRIBUTION=starter.
Return to the extracted starter folder and start the hub. Leave this terminal open and keep the PC awake. The hub listens locally on port 3457; provider adapters use separate local ports. An installed provider is not the same as a running, signed-in provider. The next steps make this authenticated hub reachable from your glasses.
npm.cmd start
Give your hub its own HTTPS address
Install Tailscale on this computer and sign in to your own account. In a second PowerShell window, run the Funnel command below and approve any Tailscale setup prompt. Copy the HTTPS address it reports. Funnel makes this port reachable over the internet, while Agent Hub still requires your token. Use Funnel rather than a tailnet-only Serve address. Route only port 3457; do not expose the local agent-adapter ports.
tailscale funnel --bg 3457
Create a private connection link on your computer
In PowerShell, return to the starter folder and run these four commands in order; stop if any command reports an error. Paste your own Funnel HTTPS address when asked and give this computer a short name. The commands validate the address and the token generated by setup, then copy your private Agent Hub link to the clipboard without printing it. This link is a password: never post it publicly. No details are sent to GlintShelf.
Transfer the copied private link to your paired phone using a private method you trust. In Meta AI, open App Settings → App Connections → Web Apps → Add a Web App. Name it Agent Hub and paste the full private link as its app address, then Connect. Open that Agent Hub entry on the glasses once; it imports the connection and shows Computers. The public QR only opens blank setup. Connecting in a phone browser alone does not configure the glasses. Menu wording can vary with Meta AI version.
Choose a project and send your first prompt
On the computer, start your chosen agent in an existing project folder and finish its login and initial setup. On the glasses choose Hub → Computers → your computer → agent → project → session. Refresh if needed, or choose New session after selecting the project. Send a small prompt and verify the reply before granting broader tasks. Keep ASK ME approvals enabled. Updates to the standalone starter are manual: preserve your private .env, stop the old hub with Ctrl+C, and start the reviewed replacement.
Choose your agent
Configure only the providers you want to use on your own computer.
Codex
Run the install command, then open PowerShell in the existing project folder you want to use and run codex.cmd. Complete OpenAI’s sign-in flow with your own account and create a session in that folder. A desktop-only or WSL-only installation may not put the CLI on this Windows PATH; codex.cmd --version must work here. Enable the pinned Claude/Codex adapter in step 3. Provider access and usage limits belong to your account.
Install Claude Code using the official guide or the WinGet command below, then reopen PowerShell so PATH changes apply. In your own project folder, run claude and finish its first-run login. Git for Windows is recommended for Bash-based tools. Enable the pinned Claude/Codex adapter in step 3. Use your own Claude Code account or supported provider setup; access and billing are separate from Agent Hub.
winget install Anthropic.ClaudeCode
claude --version
claude
OpenCode
Install the native Windows CLI and sign in to a model provider with your own credentials. Run opencode.cmd inside your project folder once to establish a session. In another terminal, start its local server with the final command below and leave it running. Keep OPENCODE_AUTOSTART=0 for this manual setup. If you already protect OpenCode with a server password, supply the matching OPENCODE_SERVER_PASSWORD to the hub’s private .env as well. Only the authenticated hub port is exposed through Funnel.
The starter also includes adapters for Ollama, Unsloth Studio, OpenClaw and Hermes; follow the starter README and each provider’s own installation guide. Ollama must be running locally with a model available. Unsloth Studio needs a loaded model and your own API key. OpenClaw needs its Gateway, and Hermes needs its CLI on PATH. These packages, models and accounts are not bundled. Begin with one working provider before adding another.
If something does not connect
The computer is offline or the connection fails
Keep the PC awake, the npm.cmd start terminal running, and Tailscale signed in. Run tailscale funnel status on that PC to check the HTTPS route points to port 3457. Confirm that you used the public Funnel address, not localhost, a private IP or a Serve-only address. After enabling Funnel, DNS and certificates can take time. Refresh Computers after the route is ready.
Unauthorized, or the private link will not import
Use the token from this exact starter folder’s .env. It must match the hub currently running there. The link generator expects the 64-character token created by npm run setup. A provider API key is not a hub token. After rotating a hub token, restart the hub and generate a new private connection link for your devices. Copy the entire link, including its #connections fragment; a rejected import preserves existing saved connections.
The computer is online but an agent is unavailable
Read the explanation on the Agents screen. Make sure the provider CLI works in native Windows under the same user as the hub, and that its own login succeeds. Codex and Claude Code need the pinned even-terminal adapter plus BRIDGE_AUTOSTART=1. OpenCode needs its server on local port 4096. Restart the hub after editing .env. If PowerShell blocks npm.ps1, use the documented npm.cmd commands instead of weakening system execution policy.
There are no projects or an existing conversation will not resume
Start a real session in the intended folder using that provider on the computer, then refresh the glasses’ project and session lists. Each computer and provider has its own list. Keep the project folder available at its original path. If a Codex session is still active in another app, finish or release that session there before resuming it from the glasses; do not open competing writers to the same session.
Adding computers while keeping one Agent Hub app
Repeat the PC setup with a separate token and HTTPS address for each computer. The private link above imports one connection; the app can merge imports and preserve other saved connections in the same browser. For a fresh installation containing several computers, an advanced #connections bundle can contain up to eight host records. If Meta AI allows editing the existing app’s address, use that entry for a later import and open it once on the glasses. Editing availability varies; phone browser imports alone never update glasses storage.
What about GitHub Direct?
The clean starter connects agents running on your own PC. Those agents can work in your own locally checked-out GitHub projects using your configured permissions. An always-on GitHub Direct hub is a separate advanced backend, not included or provisioned by this download. It requires your own hosting, repository authorization and provider configuration. The public app supplies no creator GitHub connection; do not substitute a GitHub token for the PC hub’s BRIDGE_TOKEN.
The public site, screenshots and starter include no creator computers, configured accounts, projects, access tokens or conversations. A unique hub token is generated locally for each installation.
Provider logins and API credentials belong to you. Agent Hub does not create an agent account or include provider credits. Optional hub voice transcription uses your own OPENAI_API_KEY and may incur API charges; it is disabled when that key is blank.
Connection details are stored in the browser where you import them. Phone, desktop and glasses storage are separate. Prompts and project information go to your own hub and the providers you choose.
Treat the private connection link, its token and any private QR like passwords. The generated link contains your token in its fragment; the app removes it from the visible URL after import. The catalog QR contains only the plain public app address.
The local PowerShell steps below read your own starter .env and copy a private link to your clipboard. They do not submit your details to GlintShelf or a QR service. Transfer it only between devices you control and clear the clipboard when finished.
The hub is powerful remote access to agents on your computer. Keep approvals on ASK ME and grant only intended access. To stop public access, run tailscale funnel reset on that computer and stop the hub. Rotating its token requires reconnecting your devices.
Inside the app
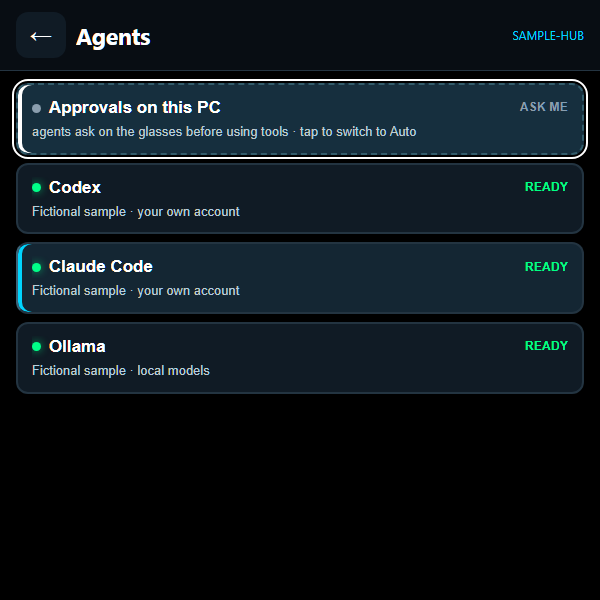
Agent Hub provider selector with clearly labeled fictional Codex, Claude Code and local-model examples
Screenshots show the prepared Agent Hub interface and clearly labeled fictional provider examples. No real account, host or token is shown.
At your fingertips
Open Hub → Computers to choose a connected computer, then choose its agent, project and session.
Move focus to Dictate or write a prompt, enter your text, then pinch Send.
Use the conversation area to read replies; Back moves up through the current screens.
Keep Approvals on this PC set to ASK ME while getting started. Review Allow and Deny requests before responding.
Use the refresh control if you have just started a provider or created a project session on your computer.